Tellyconverter photo effect generator
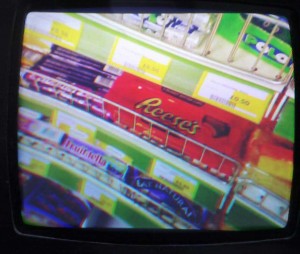
This is a project that makes your photos look like an old television, but by using a real old television rather than relying on digital filters. Once you upload your picture it’s displayed and photographed on an old television set located somewhere in South West London and then returned to you in all its distorted glory. It’s the nearest thing you can get to handmade in the world of digital delivery!
(NOTE: This project is currently offline due to the impracticality of having wires permanently trailing through the living room!)
It’s inspired by the great InstaCRT project which used a DSLR to take pictures of an old videocamera viewfinder to create interesting photo effects. Unfortunately the mobile app which accompanied that project is for iPhone only and as an Android user I was unable to use it. Then I recently became the lucky owner of a Raspberry Pi and was looking for a little project to evaluate it. I had an old Canon A70 digital camera and a splendid Rigonda VL-100 television set lying around, so I set about creating my own photo to telly converter.
The system can produce monochrome images directly or colour images by combining three separate images of the image RGB components. This video illustrates the process required to produce a colour image. However the app only processes monochrome images, partly because they don’t take as long to prepare but also because the idea here is to capture the distortion caused by physical effects and to minimise digital processing.
Some image artifacts to look out for
- Blooming: Images bow outwards in bright areas. This is caused by the increased beam current causing the tube HT voltage to drop.
- Visible retrace lines: The beam fails to shut off completely during the vertical retrace period. This set is particularly prone to this, especially noticeable in dark images.
- Pincushioning: This is an inevitable effect of using magnetic deflection. There’s a great explanation of it in The Secret Life of XY Monitors.
- Poor dynamic range: Highlights are washed out, shadows lack detail.
- Smeared vertical edges: Not so sure where this comes from. Could be the video drive transistors turning off too slowly or the effect of my composite video input bodge (see below).
System overview
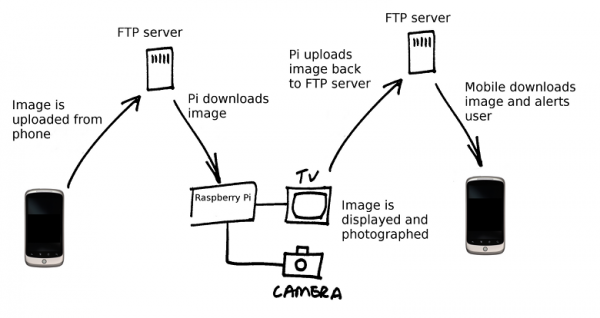
The mobile app uploads the selected image to a directory on an FTP server. A shell script running on the Pi scans this directory every minute and downloads any new images. If it finds any it turns the TV on and waits for it to warm up. Then it displays and photographs each image in turn and uploads them back to the FTP server. It then sends an alert to the mobile app using Google Cloud Messaging. When the mobile receives this message it downloads the processed image from the FTP server, saves it to the device’s gallery and informs the user with a notification.
Now lets look at the system components in more detail.
The display
The Rigonda VL-100 was manufactured in the 70s by Mezon Works in Leningrad and I picked this one up in the early 80s for £5. It’s cluttered up my parent’s house for the last 30 years (sorry Mum) and so it was great for everyone that I could find a project to use it.
The TV only has an RF input and the tuner’s frequency control is pretty poor making it diffi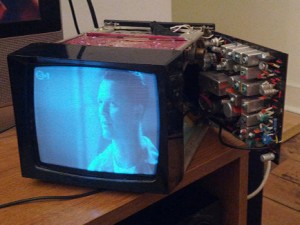 cult to rely on it to stay tuned over a long period of time. So I added a composite video input for the set, capacitively coupling the composite signal into the receiver just after the AM detector diode. This gives a reasonable picture which is unaffected by the frequency drift of the tuner.
The TV is powered by 12v from an old PC power supply and is turned on and off by a relay controlled by one of the GPIO lines of the Pi. This allows the Pi to only turn the TV on when there are pictures to process. If no new pictures are received within 10 minutes the Pi turns the TV off and waits 15 minutes before scanning for more images so as not to stress the TV tube by repeated power cycling. Unfortunately this means that sometimes it might take several minutes to process an image but hopefully this strategy will prolong the tube’s life.
The camera
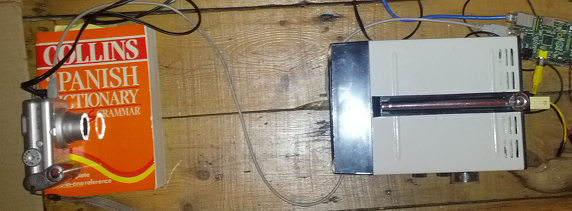
This is a Canon A70 which I rescued from a dustbin at my former employer in about 2005. It gave sterling service for many years, but like so many A70s it suffered from bad connections that made it too unreliable for everyday use. However it does support remote control over USB using gphoto2 allowing the Pi to take and download pictures automatically. Unfortunately the camera can’t engage macro mode under USB control so it’s set up at the minimum distance from the TV that still allows it to stay in focus:
This results in an image of the screen together with the surroundings, which is then cropped by the Pi using Imagemagick to give the final picture:
The Pi
The Pi used is a model B. It’s connected to the network via the on board Ethernet connector and to the camera via one of the two USB ports. Being Linux based it’s simple to install any drivers and packages required, making it a very powerful development platform.
TV connection
The Pi has a composite video output which makes it simple to connect to the TV. All that needs to be done for the display is to set the Pi’s video standard to 50Hz/PAL which can be done by uncommenting the line:
|
1 |
sdtv_mode=2 |
in /boot/config.txt and restarting.
GPIO setup and relay control
GPIO port 17 is used to control the TV power relay. The GPIO line is set up in the main control script by creating a file called setup_gpio.sh with the contents:
|
1 2 3 4 5 6 |
#prepare GPIO17 for output echo "Setting up GPIO for output..." echo "17" > /sys/class/gpio/export echo "out" > /sys/class/gpio/gpio17/direction chmod 666 /sys/class/gpio/gpio17/value echo "Done." |
This is then set to have root permissions:
|
1 2 |
chown root:root setup_gpio.sh chmod 700 setup_gpio.sh |
Now the port can be set up in the main script running as user ‘pi’ by executing:
|
1 |
sudo ./setup_gpio.sh |
and turned on and off by writing 0 or 1 to the appropriate device file:
|
1 2 |
echo 0 > /sys/class/gpio/gpio17/value echo 1 > /sys/class/gpio/gpio17/value |
The IO line drives the relay using the following circuit:
Image display and capture
The images are displayed on the screen using the qiv command. This displays the image on the primary display, full screen, hiding the cursor and status bar:
|
1 |
qiv -f -m -i off --display=:0.0 image.jpg |
And photographed/cropped using:
|
1 2 |
gphoto2 --capture-image-and-download --filename ./image.jpg --force-overwrite convert ../out.jpg -crop 942x798+528+483 ./image.jpg |
Creating colour images
Once this is working, it’s a simple step to process colour images by taking three separate pictures of the red, green and blue channels and then combining them. First split the original image in to three channel images:
|
1 2 3 |
convert img.jpg -channel R -separate r.jpg convert img.jpg -channel G -separate g.jpg convert img.jpg -channel B -separate b.jpg |
Once they’re photographed and cropped they can be combined to produce a single full colour image. The resulting pictures have an odd quality because unlike pictures of a conventional colour CRT, there’s no shadow mask or discrete phosphor dots. The pictures appear much more photographic.
|
1 |
convert r.jpg g.jpg b.jpg -set colorspace RGB -combine -set colorspace sRGB img.jpg |
The app
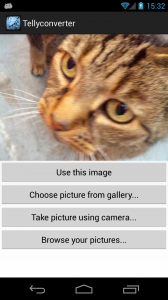 This is a simple Android app which allows the user to take a photo using the camera, or choose an image from the gallery. Once chosen the image is cropped to a 4:3 aspect ratio and uploaded to the FTP server. When processing is complete the server alerts the device with a GCM message which causes it to download the processed image from the FTP server. It’s been tried on a few devices but testing has by no means been exhaustive. Your mileage may vary. Known issues:
- Sometimes the notification message can take a long time to arrive after it’s sent. If the notification doesn’t arrive to tell you your image is ready then click the ‘Browse your pictures…’ button in the app to see a list of your processed images.
- You are identified to the server by a unique ID that’s generated when you first run the app. Uninstalling or clearing the app data will delete this ID and any pictures that haven’t been downloaded will then be inaccessible.
- Processed images are saved at the back of the device gallery making them difficult to find.
- The app relies on the device having the ability to crop images. If that’s not supported it won’t work. The Motorola Droid appears to crop but doesn’t return the image, instead setting the device wallpaper to the selected image.
Future development
There are several parts of the system that could do with improvement:
- Polling an FTP server isn’t very efficient. Allowing the server to scp files direct to the Pi would be better.
- This setup isn’t very scalable. It takes about a minute to process a monochrome image, longer for colour. Using a video camera instead of a digital camera could conceivably get the throughput to maybe 10fps. You’d need something with more power than a Pi to keep up with that though!






Wow Mark, like the idea of the hardware image filter. Can you turn it to a Photoshop plugin ? That would be hilarious and definitely a first such real filter. Will you publish the application in the Google Play ?
That’s a great idea! The app is on Play already: https://play.google.com/store/apps/details?id=com.frisnit.tellyconverter
Give it a go!